Data Loading
Overview
Depending on the setting, you may have to load the data for a due return. All returns have the same structure. You can either load a single report (corresponding to a sheet in the Excel template from BoG) in a return or load the entire return. All returns have the same layout and features as shown below.
-
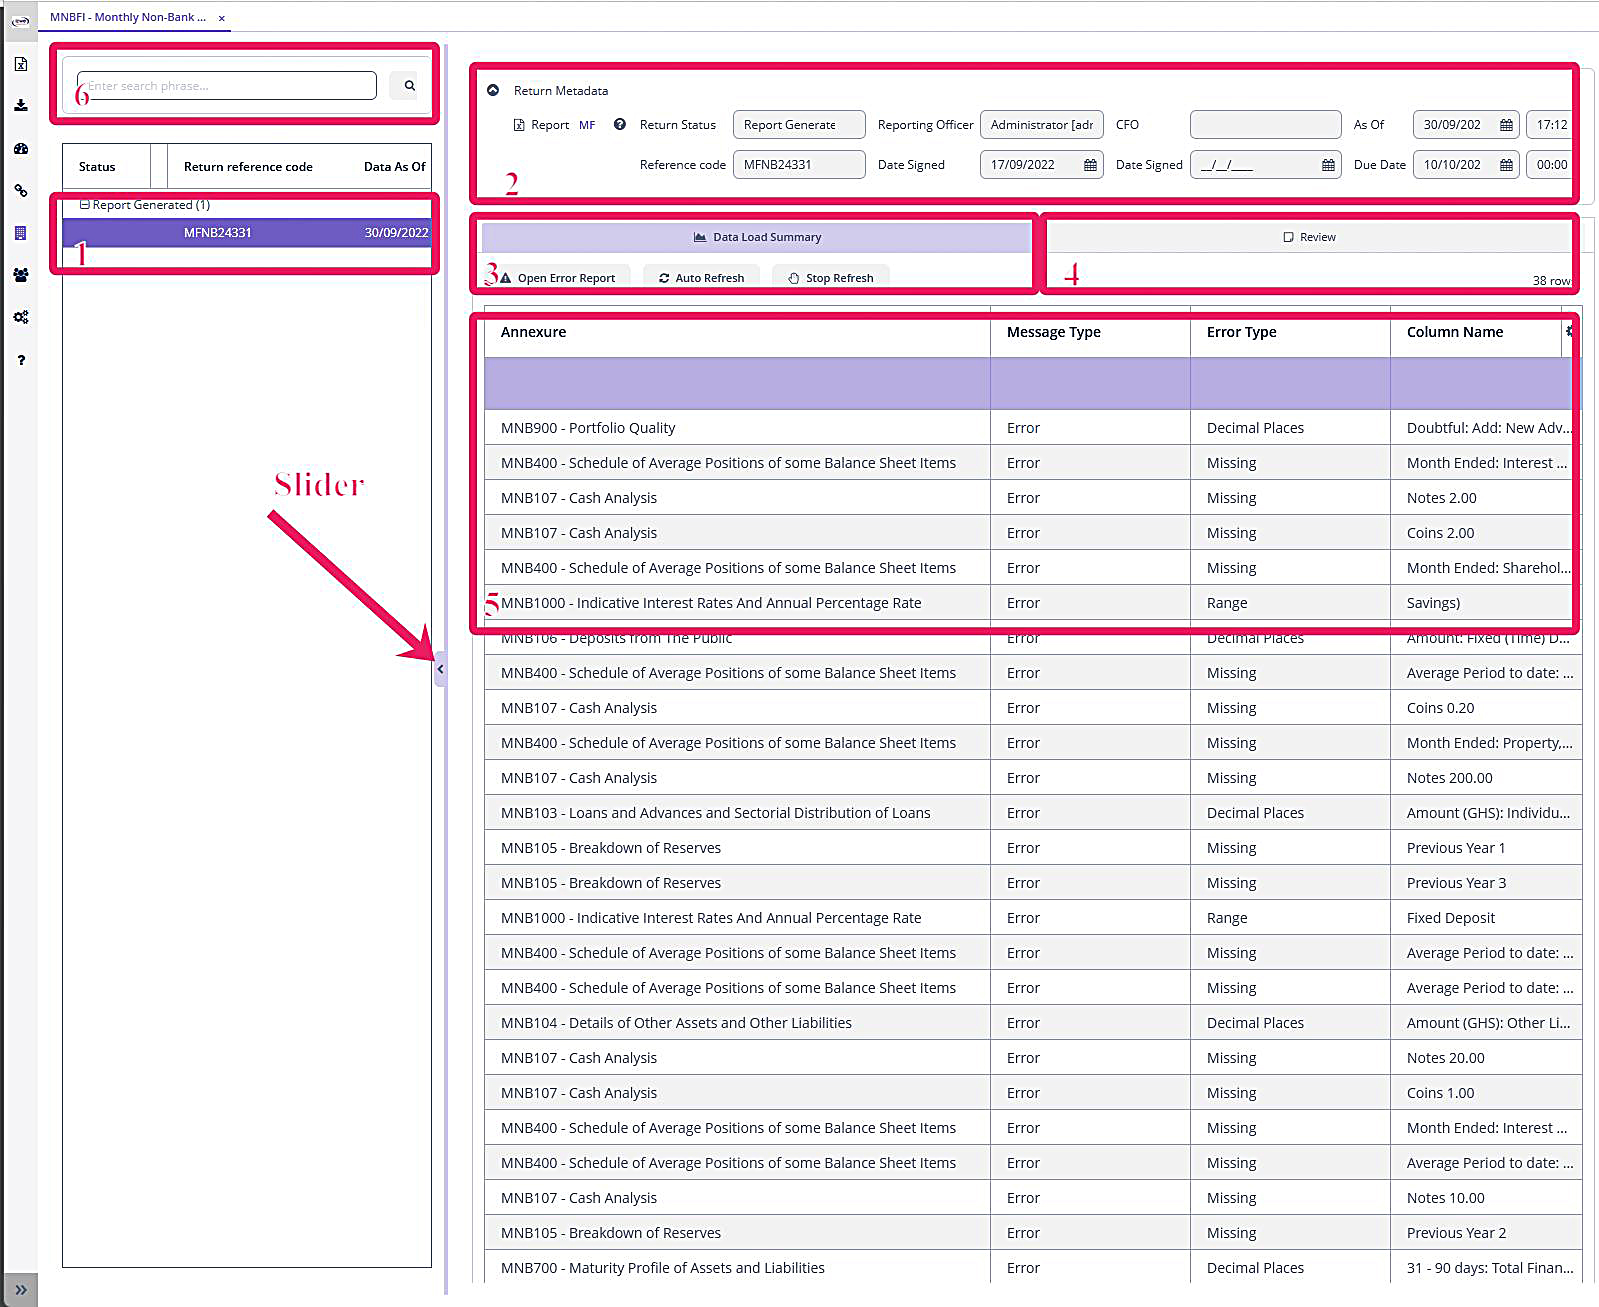
Return List Browser (List of available returns). All returns that are due to BoG will be listed here and grouped according to status. Select a return to load its details to the right. There are five status codes:
-
In Process - This means the return is ready for processing. BoG has created this return in its system and Excenit RSS has pulled the details from the BoG API.
-
Data Loading - This means the data is being loaded. Typically, this status message is only possible when loading returns with a lot of records such as MAFI. Once the data load is complete, the status will change to either Data Loaded with Errors or Data Loaded.
-
Data Loaded with Errors - This means the data load is complete but at least one record failed validation.
-
Data Loaded - This means all data for the return were loaded and there are no errors or warnings to review.
-
Report Generated - After the report has been generated (Microsoft Excel or XML).
-
Pending CFO Review - The return has been submitted to the designated CFO for review. The CFO has yet to act on it.
-
CFO Approved - CFO has reviewed and approved the return. The return will be submitted to BoG via the API within a fixed time, which is five minutes by default but can be changed by the Administrator.
-
CFR Rejected - CFO has reviewed the return and rejected it. See the Review tab for optional notes from the CFO on what to correct.
-
Submitted to BoG - The return has been transmitted to BoG after the CFO approved. At this point, there’s nothing else to do but wait for status updates from BoG. Excenit RSS polls the BoG API at periodic intervals for updated status.
-
BoG Rejected - BoG has completed its validation and rejected the returns because of errors. In this state, the Report Manager can edit the return and fix the issues identified.
-
BoG Accepted - BoG has completed its validation and there are no errors with the returns. The return is no longer editable unless unlocked by the CFO. The Report Manager can request unlock from the CFO.
-
-
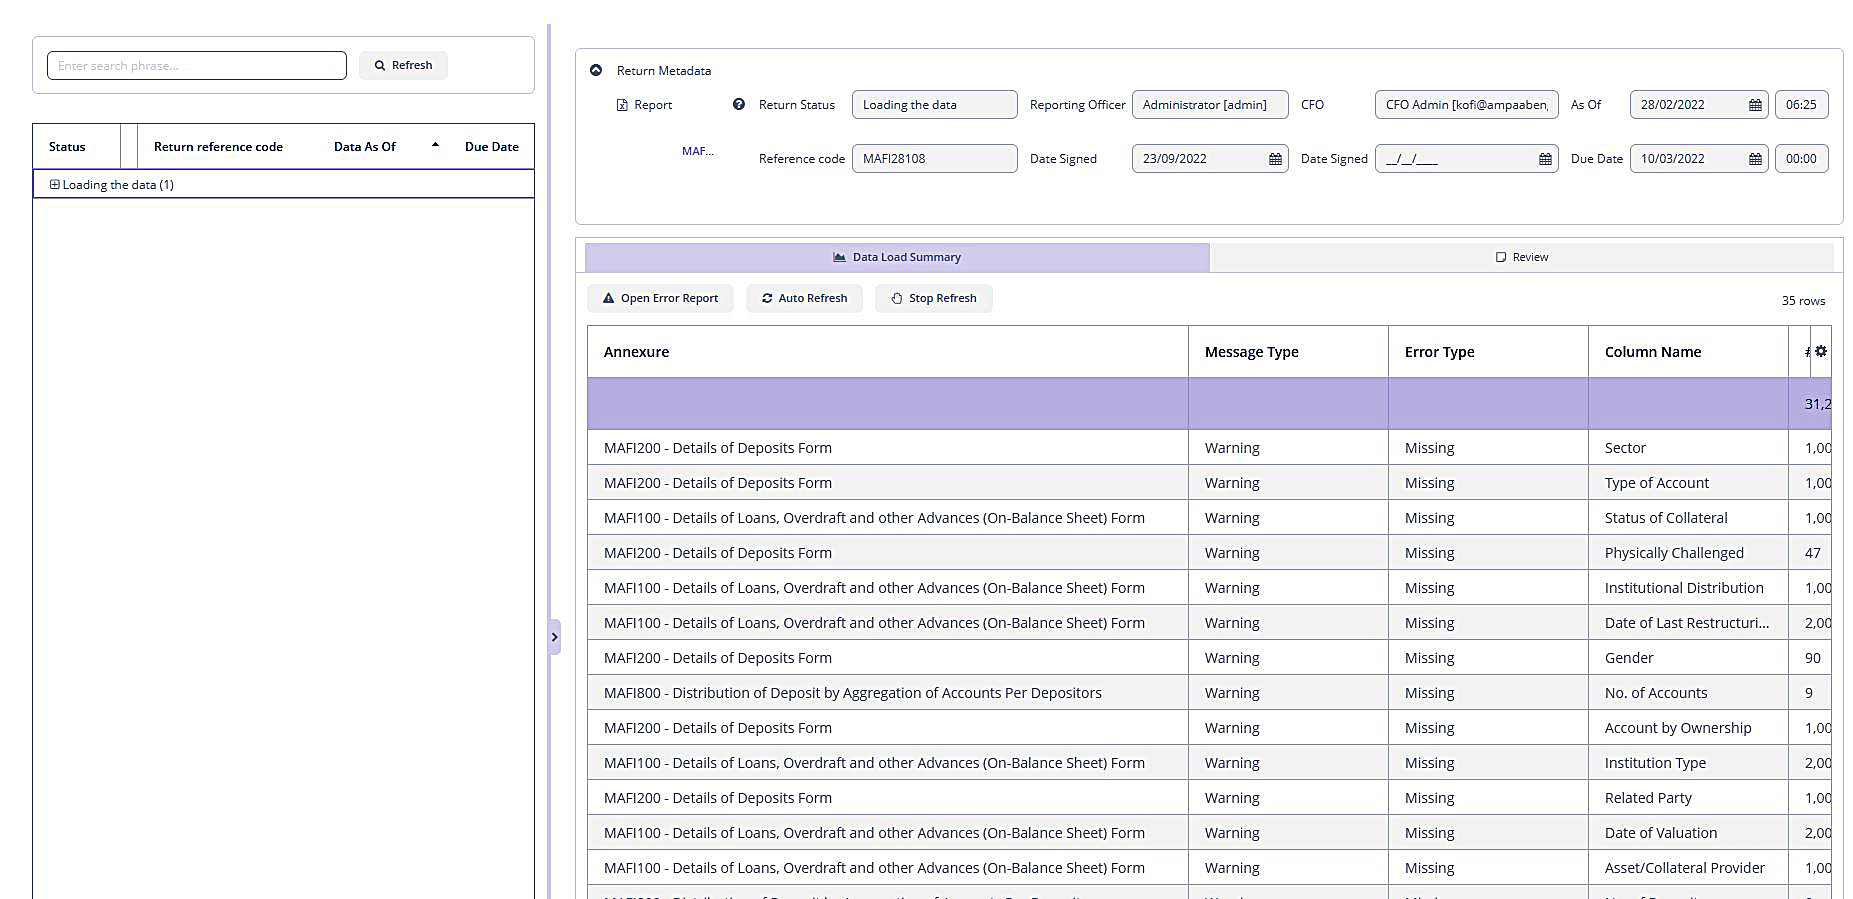
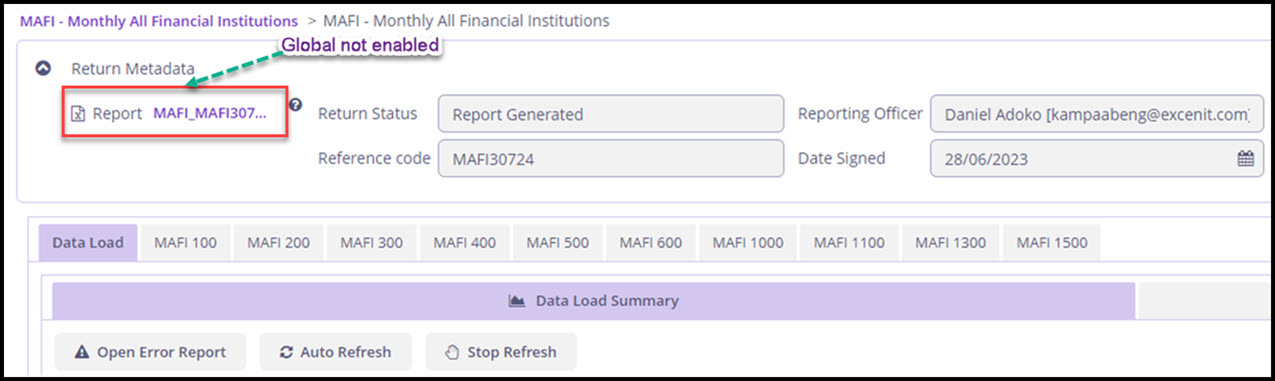
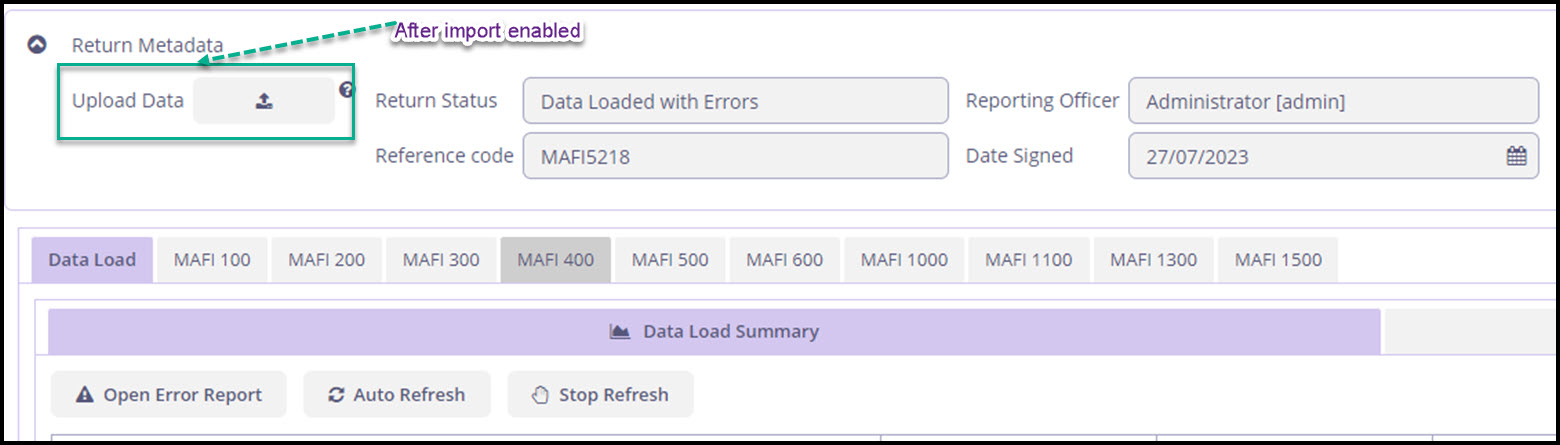
Return Metadata - This section is not editable and provides information about the return. It also includes the return in Microsoft Excel format for download. When the status of the return is In Process, the Excel file is usually empty, showing the blank template from BoG. The Return Status field is the same information as in 1. The Reference Code is the BoG code assigned to this return. Reporting Officer, CFO, As Of, Due Date, and Date Signed are all completed automatically by the system. If the Administrator has enabled data upload option, the Report Status field will also show an option to upload data. This feature is disabled by default and typically, not advisable. It is useful when the return has been prepared outside the Excenit RSS system, and you would want to use the API feature of Excenit RSS to submit to BoG. See the section on uploading returns for more information.
-
Data Load Summary - This tab shows the summary of the validation of the returns.
-
Click Open Error Report to see the error report of the return. See more details in the Validation section.
-
Click Auto Refresh to automatically reload the validation summary at fixed intervals. The default is every 30 seconds.
-
Click Stop Refresh to stop the auto-refresh.
-
-
Review - This tab contains messages and notes from the CFO after review.
-
Validation Summary - This page shows the summary of the validation. They are grouped by report, Message Type (error or warning), Error Type, and the Column Name.
Use the Slider to customize the available space. Slide to the right to increase the size of the Return List browser or to the left to reduce it. Double-click the arrow in the slide to fill the whole page with the details of the selected return.
In this view a return is not editable. In order to edit a return, double-click it in the Return List browser to open in edit mode.
-
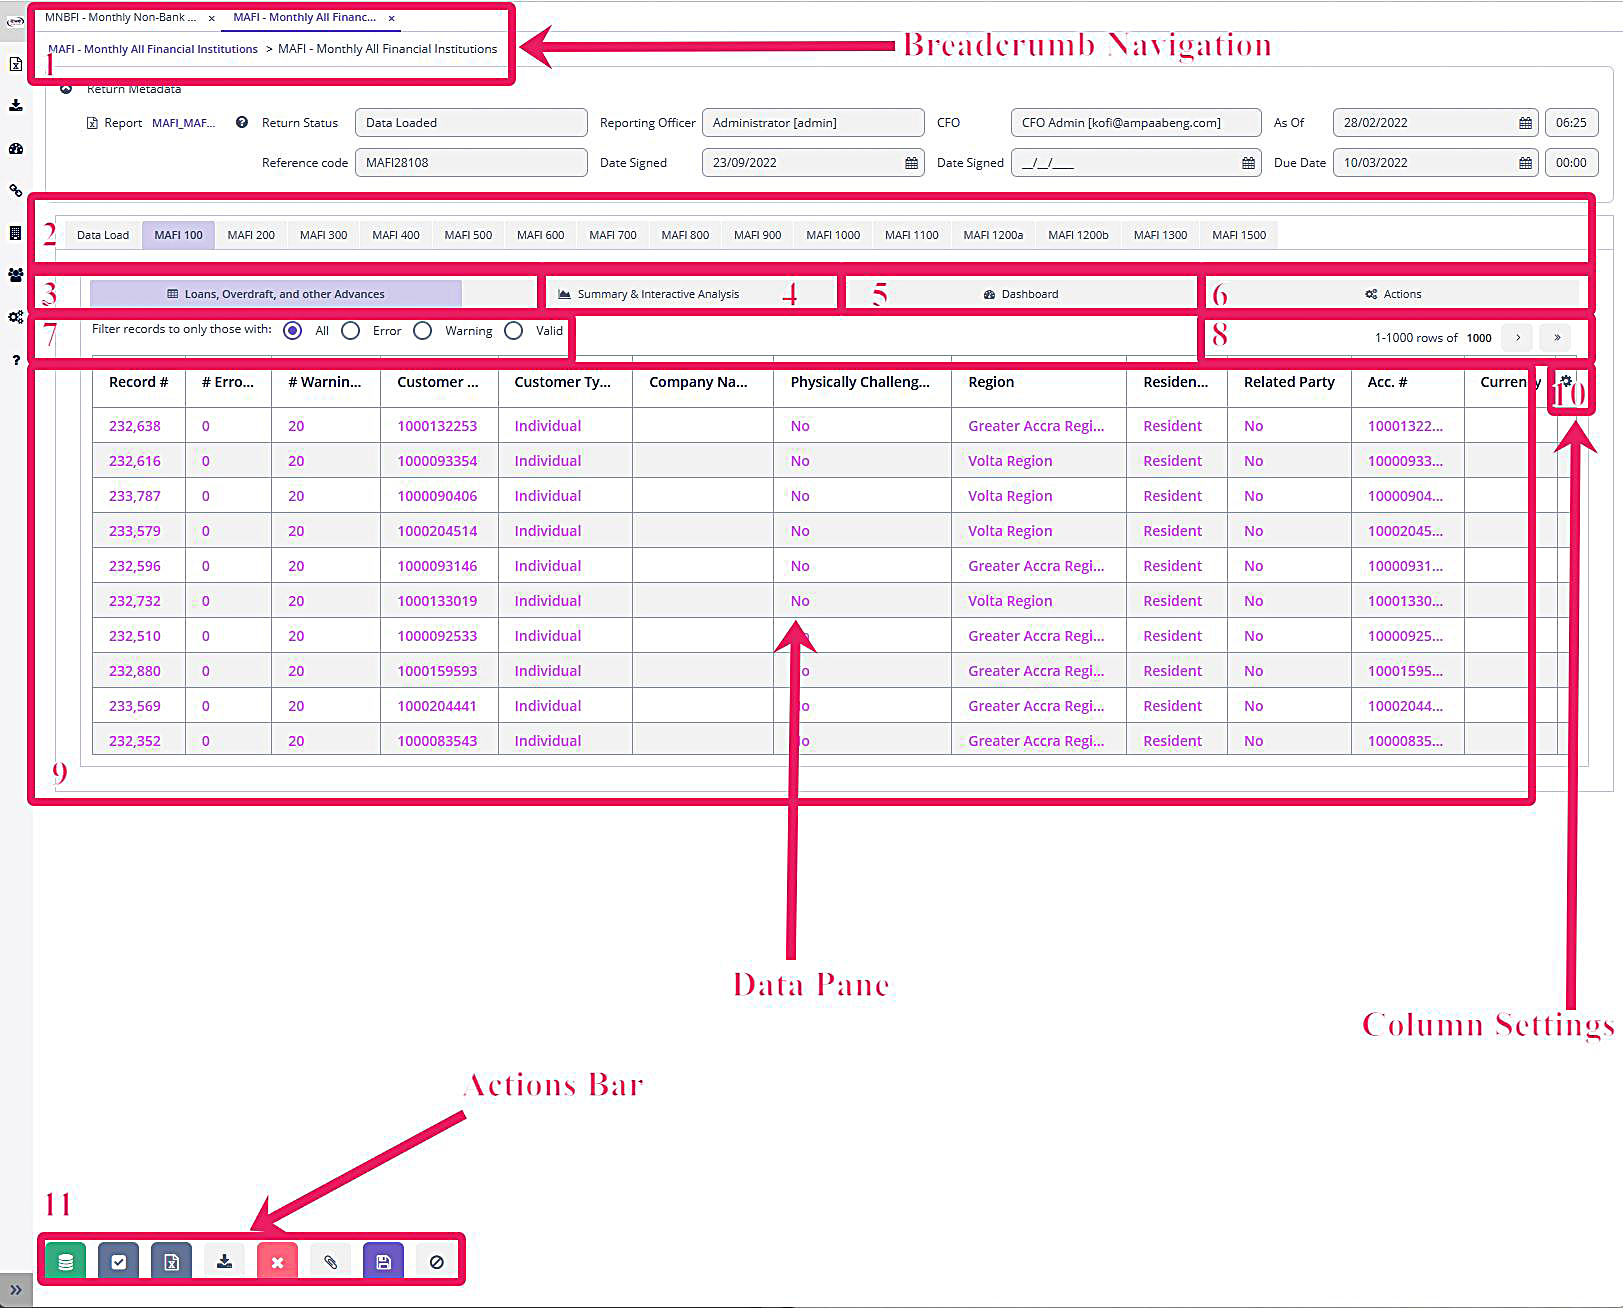
Breadcrumb Navigation - This shows you where you are in relation to the list of returns. In the image above, we have loaded the MAFI return in edit mode.
-
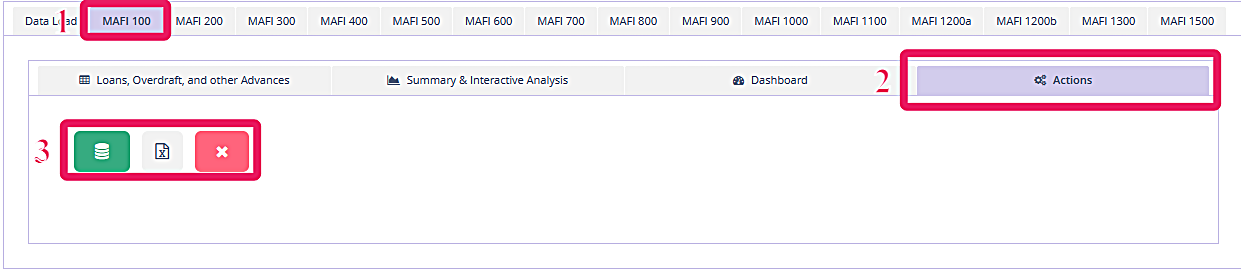
Report List (Sheets in Excel Template) - All the Sheets in the return will be listed here. For example, the return below shows all the tabs of the MAFI return. MAFI 100, highlighted in purple, has been selected and therefore the data have been loaded into the data pane (box 9).
-
Data Tabs - Lists the sections of data in a sheet/report . For example, in the image below, MAFI 100 is titled "Loans, Overdraft, and other Advances", which is shown here.
-
Interactive Analytics - Allows you to conduct quick analyses of the data using dynamic pivot tables. See more information in the "Analytics" section.
-
Dashboard - Similar to box 4, this tab allows you to view quick analytic data using pre-designed templates.
-
Actions - Use this tab to perform report-specific tasks such as loading data for only one Sheet instead of loading all the data for the return.
-
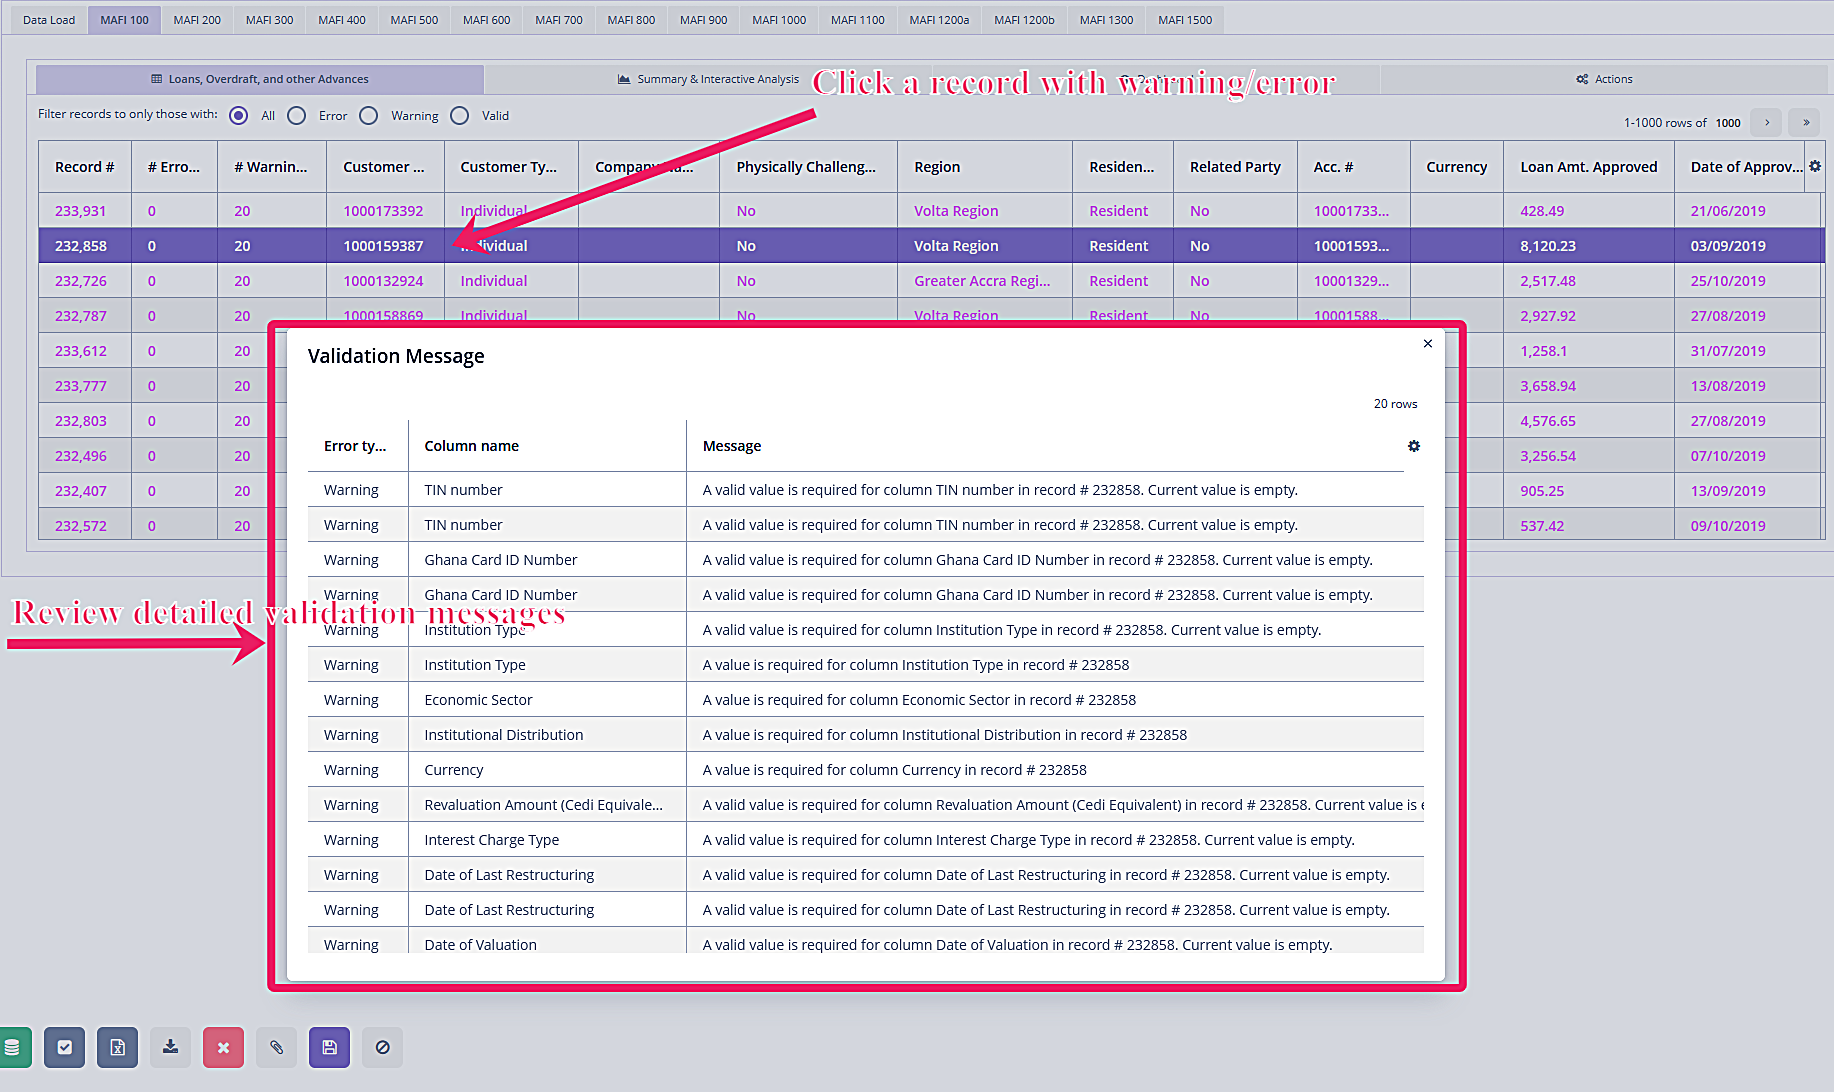
Filter Bar - Use these buttons to filter the displayed data for the sheet/report by error status. By default, all records are shown. Select the Error option to display only records with errors. Similarly, the Warning option shows only records with warnings. Finally, the Valid option lists only records in the reports that have no validation issues.
-
Records Navigator - By default, the data pane shows only 1,000 records. Use the arrows in box 8 to navigate through the records. Contact the Administrator to change this value. However, loading more records than 1,000 at a time will increase data load time.
The default records to be displayed can be modified in the . -
Data Pane - This is where the records in the report are loaded. By default, only the most relevant columns, usually those required by BoG, are loaded. The records are color-coded. Red means they have errors and purple means they have warnings. Records not colored have no issues. Click on a colored record to view details of the error or warnings. See "Validation" for more details.
-
Settings - Use this button to choose the columns in the report that will be displayed in box 9.
-
Action Bar - Use the buttons in this bar to manage the return.
-
Click
 to load the data for the entire return. By default, this action both loads and validates the data.
 -
Click
 to re-validate data. This is important if you manually edit the data after loading.
 -
Click
 to generate the Excel report after data loading. This only works if data has been loaded.
 -
Click
 to
download the generated Excel return.
to
download the generated Excel return. -
Click
 to reset all the data on this return.
 -
Click
 to submit this return to CFO for approval.
 -
Click
 to save changes.
 -
Click
 to close without saving any changes.
-
Load a Return
-
To load a return, log in as a user with Report Manager privileges.
-
In the Return List browser, select the return to process. Double-click to open it in the Return Edit pane in edit mode.
-
From the Action Bar, click the data load button. This will open a window with options:
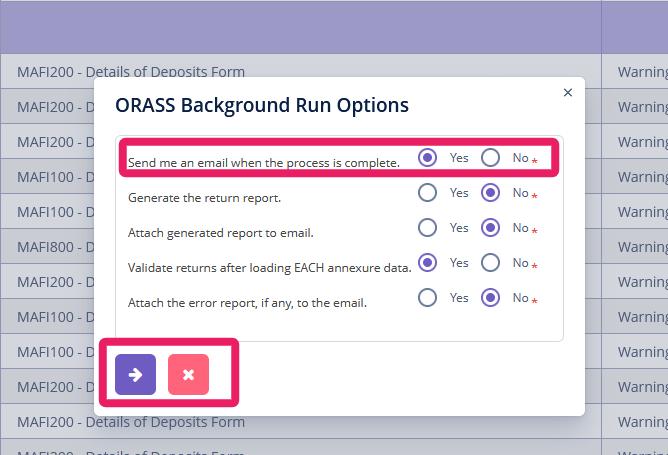
There are five options to consider. The default options are the most common. Only change if necessary. The most important, especially for long-running returns like MAFI, is the option to email the Report Manager when the data load and validation are complete. If you select "No", the data will still load in the background but there will be no notification.
-
Click the proceed button
 to load the data or the cancel button
 return to terminate the process.
 -
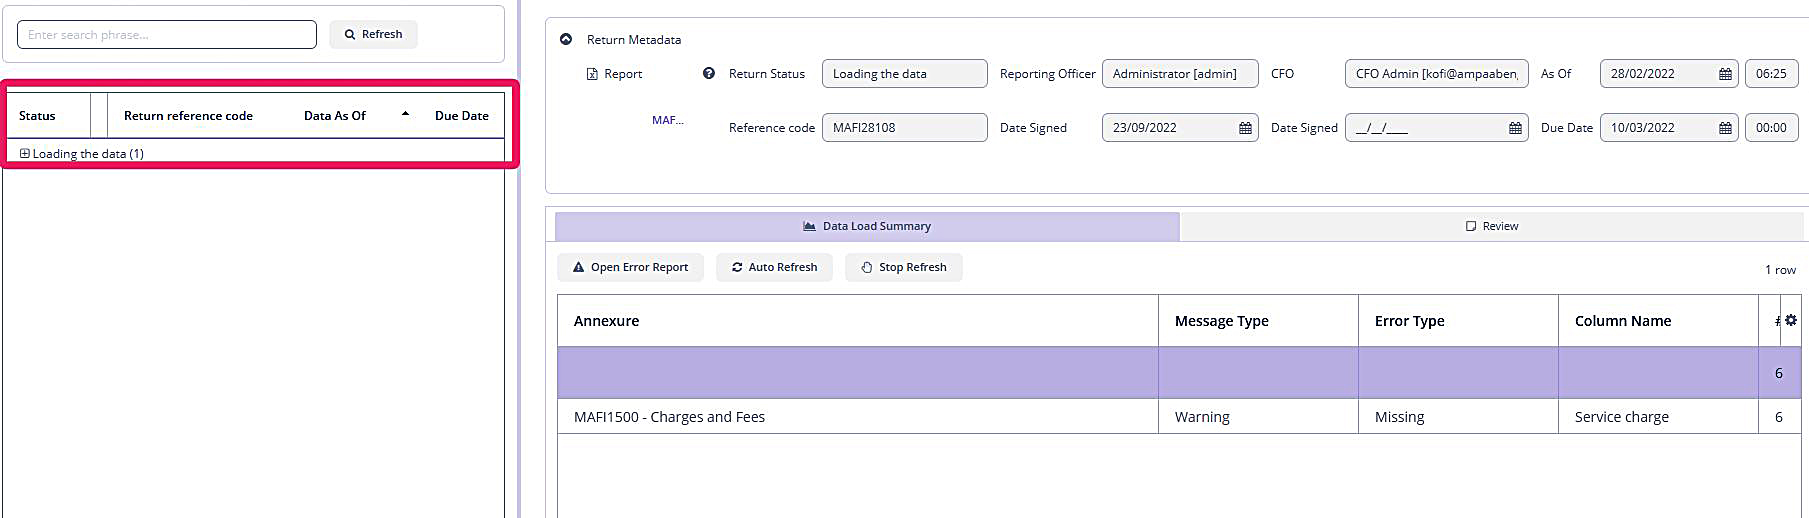
If you proceed to load from the previous step, you will see the following screen, showing the change in status to Loading the data :
-
If you click Refresh, the validation statistics will be updated as below:
-
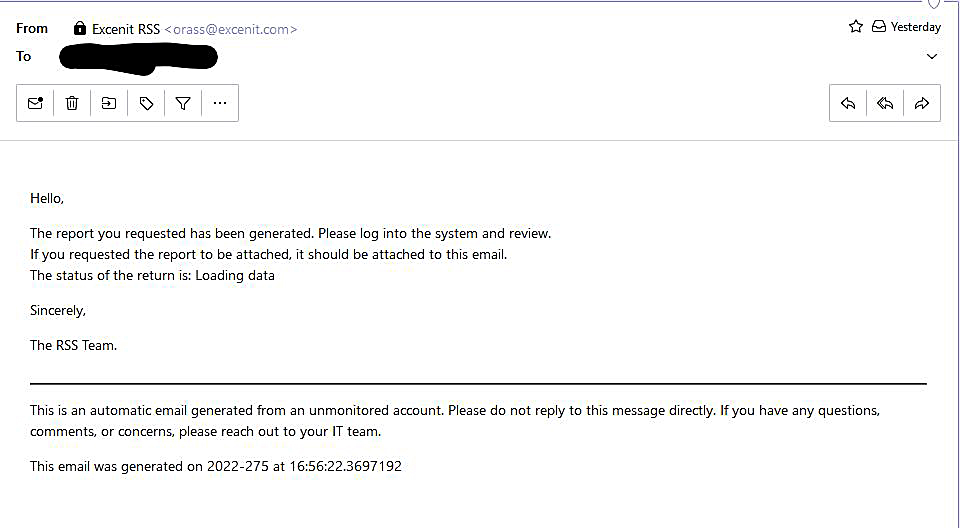
You will receive an email if you opted for one in step 3.
-
Review the data by opening the return in edit mode.
-
If a record contains errors or warnings, it will be color-coded: red for errors and purple for warnings.
Load Data for a Single Report (Excel Sheet)
Sometimes it might be necessary to load data for a single report instead of the entire pack. This approach is useful for re-loading data after errors or warnings have been addressed.
To load the data for a single report:
-
Navigate to the report/sheet in edit mode.
-
Select the "Actions" tab.
-
Click the data load button and follow the process.
Edit Data
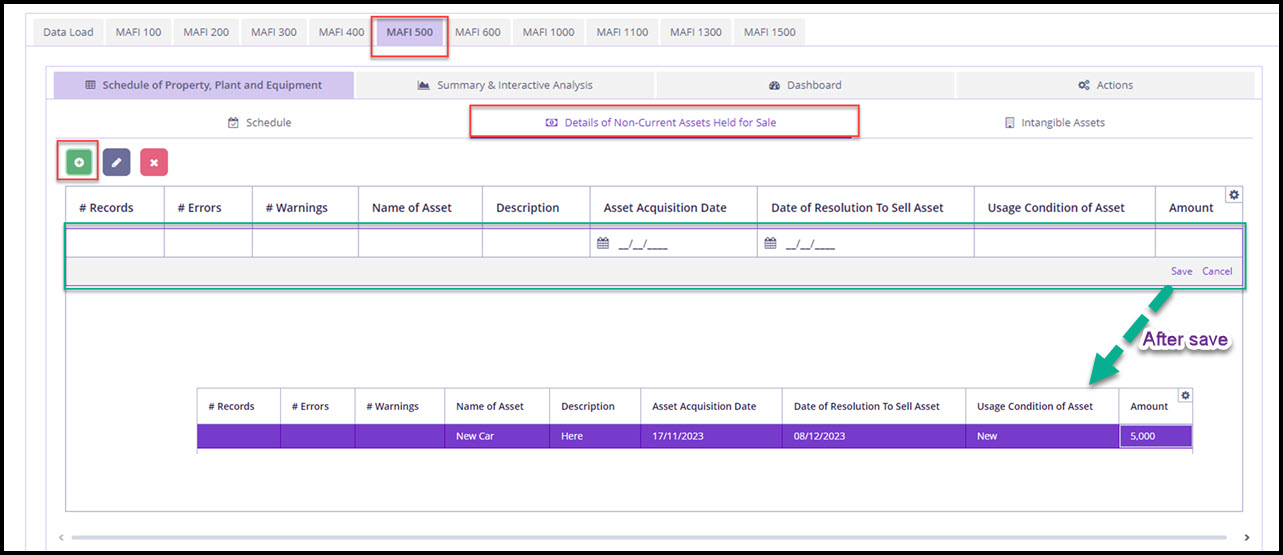
While not encouraged, there are times the loaded data must be edited. Examples include data that are not readily available in the core banking database. Excenit RSS allows selective editing in some circumstances, especially for reports with summary data such as MAFI 500 or QAFI 100.
When editing is enabled, new records can either be inserted or loaded data on the screen can be modified.
| All data edits are logged when audit logging is enabled. |
-
Navigate to the report. In the example below, we want to insert records for MAFI 500 — Details of Non-Current Assets Held for Sale, which aren’t available in a standard way.
If a report has multiple sections, there will likely be tabs within the report. -
Click the
Addbutton to insert a new record, which will add a new empty row. -
Type in the data for the record and save.
-
You can add additional rows before or after saving.
-
If enabled, automatic validation will be triggered to ensure the new data would meet ORASS requirements.
-
Optional. Inserted data can be edited or deleted.
-
Save the pack when complete and manually initiate validation if desired.
-
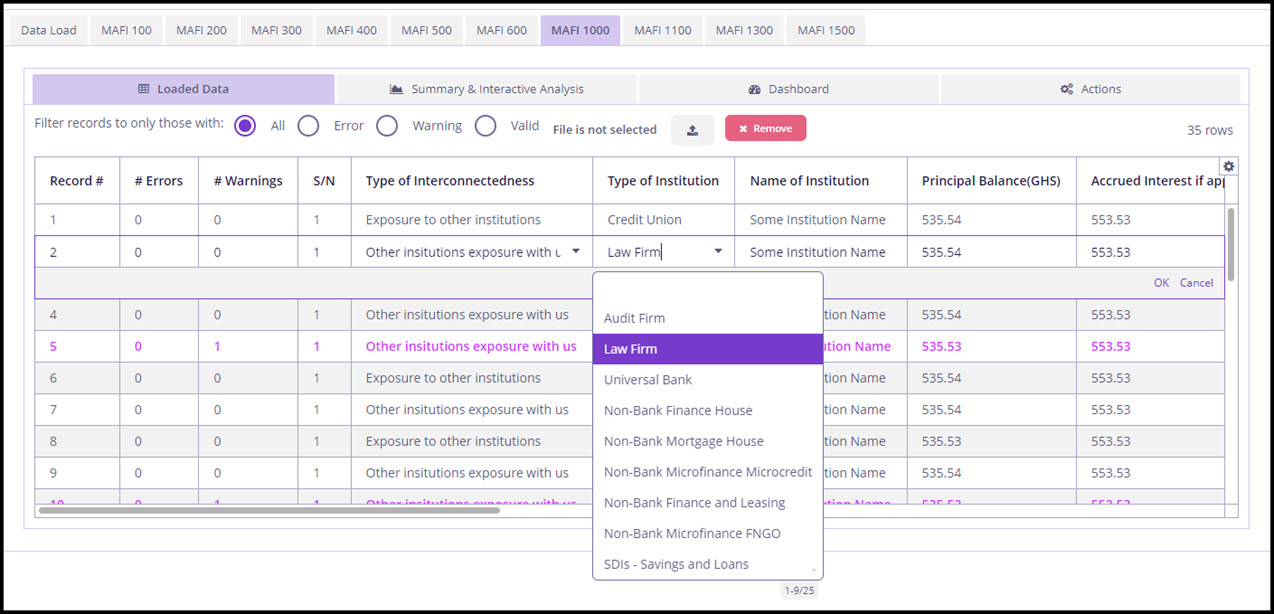
Navigate to a report that permits editing.
-
Double-click the field to edit.
-
Save the record and save the pack.
-
Validate if necessary.
Data Import
Some Excenit RSS license options allow for the import of data directly into the software for validation and submission to the ORASS API.
-
Customized Report Import - import data for specific reports only.
-
Global Import - import entire return, including all reports/sheets and
Customized Report Import
Currently, Excenit RSS allows customized report import on selected reports within a return. Using this feature requires the data
to be provided in a format specified by Excenit RSS. Typically, customized imports are enabled for reports for which
the data are unlikely to reside in the core banking application.
-
Identify the template for the report of interest. This is available in the
Templatespage. -
Navigate to a return that allows bulk import, e.g., MAFI 1000
-
Locate the
Importbutton on the tab. -
Upload the data
Global Import
A user with orass-system-admin privileges must enable data import in Application Properties before use.
|
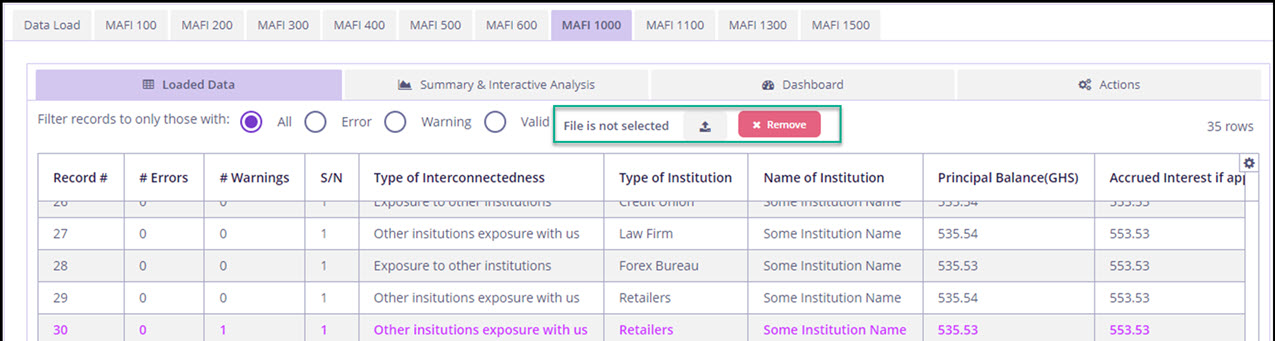
When global import is enabled, the import button is available for the entire pack. When it is not enabled, the Report Metadata section shows the attached report template, which can be downloaded.
After import is enabled, the Upload Data button is enabled.
-
Click the
Upload Databutton and navigate to the file.Global import only works with the BoG template for the select pack. -
Select the file you want to upload. Depending on the size of the file the next screen might take a while to load since the file must be loaded into memory.
-
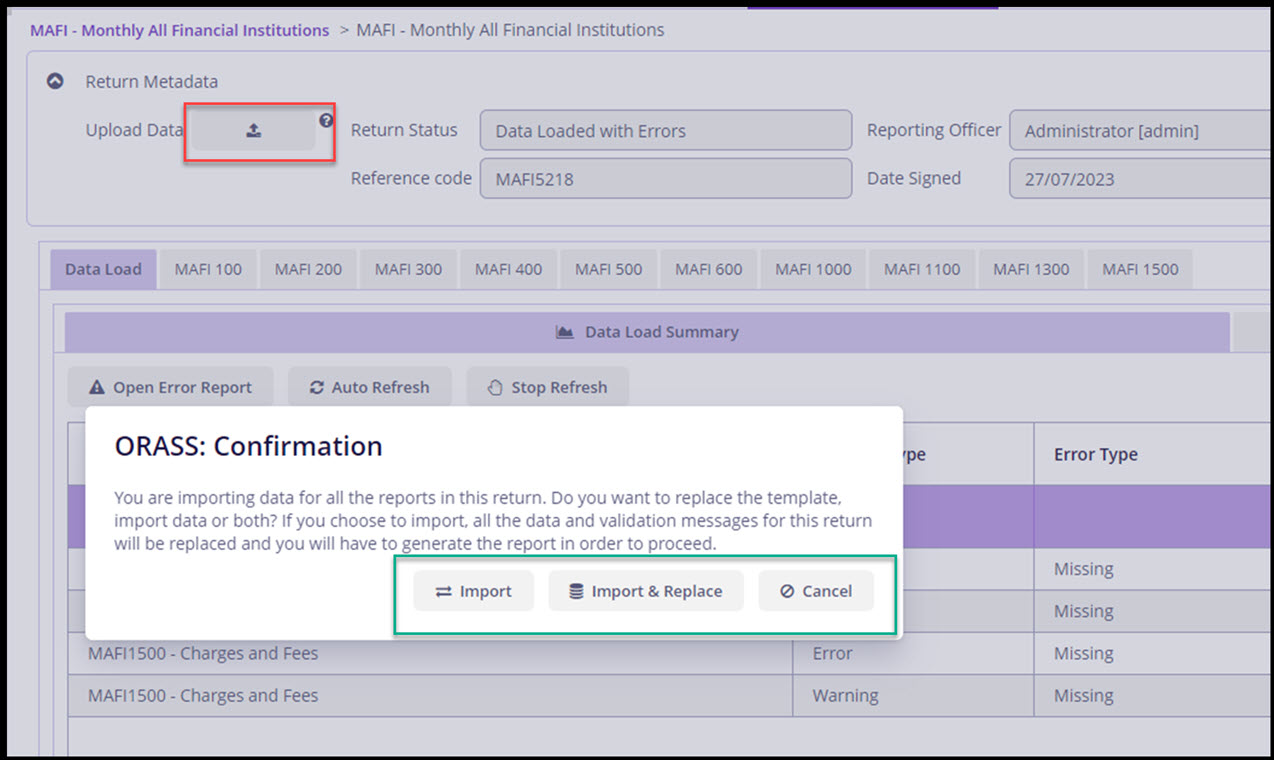
On the
Confirmationscreen choose an import option:-
Import and replace — the final return to BoG will use the file that was uploaded.
-
Import — only the data will be imported and the standard templates will be used to generate the returns.
-
-
All the data in the file will be extracted and inserted into Excenit RSS. In addition, they will be validated for accuracy.
-
When complete, you can proceed to examine data, review error log, or submit for approval.